Step 1: Parts List
Our bell ringer is pretty simple, and we were able to cobble most of it together from parts we had from other projects.
- Raspberry Pi 2 Model B Project Board
running Raspbian Jessie
- Edimax EW-7811Un 150Mbps 11n Wi-Fi USB Adapter
- A microservo
- The hammer from a Don't Break The Ice game
- A breadboard and M/M and M/F jumper wires
- A call bell
- 1/4" plywood and 1"x6" board for base
Optional Parts:
- LED light and resistor to show when the bell is activated
- Microswitch for local testing
Step 2: Testing and Electronic Assembly
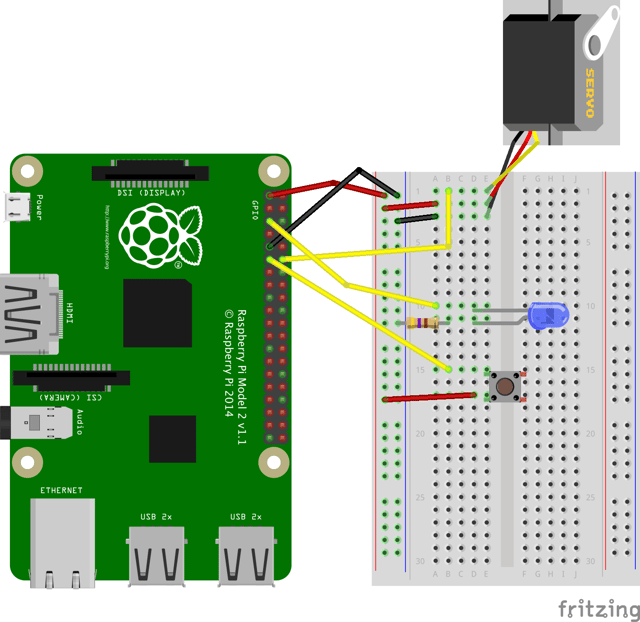
Our wiring diagram is pretty basic. In fact, you don't even need the LED and switch in order to make the bell ring, but I found it useful to test quietly and calibrate the servo range without going into the NodeRED code.
Step 3: Update NodeRED to use JohnnyFive for Servo Control
This step assumes that you have set up your Raspberry Pi with the latest Jessie image and have successfully connected it to your network.
I followed the directions on the NodeRED site to update the installation to use newer versions of Node.js. This proved to be a requirement for JohnnyFive.
Install the following nodes to control the servo:
- JohnnyFive
- Raspi-io (see directions on the JohnnyFive page to install the npm package)
- Add MeshBlu for delivering Webhook rings (optional)
Step 4: Create the NodeRED Flow
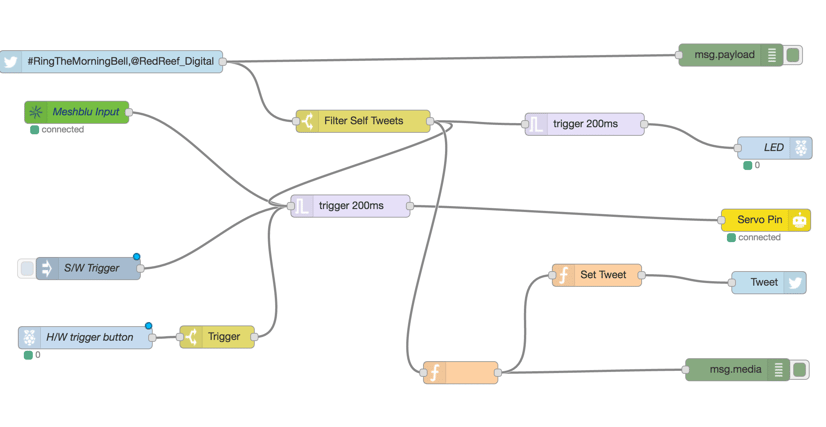
 The left side of the diagram contains all of the inputs to the flow, starting with a Twitter node to collect hashtag mentions, followed by a Meshblu node for webhooks, a manual injection to ring the bell in software, and a GPIO node to detect presses of the hardware button.
The main trigger node changes the payload to 64 then waits 200ms and changes the payload to 120. These messages are sent to the servo pin, which swings the hammer to the 64 degree ring position, and then back to the 120 degree standby position.
After that, we send a new tweet that mentions the original user and attach our bell ringing gif to the message.
Here's the NodeRED code to paste into the import field. You'll need to add your own Twitter and Meshblu credentials to make this work.
[{"id":"4efaf509.f399cc","type":"meshblu-server","z":"a9a0b6c7.3d74a8","server":"meshblu.octoblu.com","port":"80","uuid":"","token":""},{"id":"3635dfc8.67114","type":"nodebot","z":"a9a0b6c7.3d74a8","name":"Self","username":"","password":"","boardType":"raspi-io","serialportName":"","connectionType":"local","mqttServer":"","socketServer":"","pubTopic":"","subTopic":"","tcpHost":"","tcpPort":"","sparkId":"","sparkToken":"","beanId":"","impId":"","meshbluServer":"https://meshblu.octoblu.com","uuid":"","token":"","sendUuid":""},{"id":"2fb4985f.282158","type":"gpio out","z":"a9a0b6c7.3d74a8","name":"Servo Pin","state":"SERVO","pin":"GPIO18","i2cDelay":"0","i2cAddress":"","i2cRegister":"","outputs":0,"board":"3635dfc8.67114","x":1034.5,"y":374,"wires":[]},{"id":"d808253d.9cd568","type":"inject","z":"a9a0b6c7.3d74a8","name":"S/W Trigger","topic":"","payload":"180","payloadType":"num","repeat":"","crontab":"","once":false,"x":124.5,"y":439,"wires":[["cb9edefb.21d1"]]},{"id":"cb9edefb.21d1","type":"trigger","z":"a9a0b6c7.3d74a8","op1":"64","op2":"120","op1type":"num","op2type":"num","duration":"200","extend":false,"units":"ms","reset":"","name":"","x":476.5,"y":355,"wires":[["2fb4985f.282158"]]},{"id":"743e25bd.12bb6c","type":"meshblu in","z":"a9a0b6c7.3d74a8","name":"Meshblu Input","directToMe":true,"uuid":"","server":"4efaf509.f399cc","x":109,"y":229,"wires":[["cb9edefb.21d1"]]},{"id":"14bd3e10.107292","type":"rpi-gpio in","z":"a9a0b6c7.3d74a8","name":"H/W trigger button","pin":"11","intype":"down","debounce":"50","read":true,"x":120.5,"y":532,"wires":[["fcda212c.8a7e4"]]},{"id":"fcda212c.8a7e4","type":"switch","z":"a9a0b6c7.3d74a8","name":"Trigger","property":"payload","propertyType":"msg","rules":[{"t":"eq","v":"1","vt":"num"}],"checkall":"true","outputs":1,"x":297.5,"y":531,"wires":[["cb9edefb.21d1"]]},{"id":"f92423fc.5df7","type":"rpi-gpio out","z":"a9a0b6c7.3d74a8","name":"LED","pin":"15","set":"","level":"0","out":"out","x":1046.5,"y":277,"wires":[]},{"id":"d36fc575.a2a4b8","type":"trigger","z":"a9a0b6c7.3d74a8","op1":"1","op2":"0","op1type":"num","op2type":"num","duration":"200","extend":false,"units":"ms","reset":"","name":"","x":791,"y":245,"wires":[["f92423fc.5df7"]]},{"id":"43fb34a4.df2b6c","type":"twitter out","z":"a9a0b6c7.3d74a8","twitter":"","name":"Tweet","x":1038.5,"y":458,"wires":[]},{"id":"3d6f59fe.25e956","type":"twitter in","z":"a9a0b6c7.3d74a8","twitter":"","tags":"#RingTheMorningBell,@RedReef_Digital","user":"false","name":"","topic":"tweets","x":155,"y":161,"wires":[["9672a7c7.985148","cfed7640.ce8538"]]},{"id":"74d13426.326b3c","type":"function","z":"a9a0b6c7.3d74a8","name":"Set Tweet","func":"msg.payload = \"@\" + msg.topic.substr(7,msg.topic.length - 7) + \" rang the morning bell w/ @RedReef_Digital! #RingTheMorningBell http://reef.red/1UWvRPX\";\nreturn msg;","outputs":1,"noerr":0,"x":807.5,"y":448,"wires":[["43fb34a4.df2b6c"]]},{"id":"cfed7640.ce8538","type":"debug","z":"a9a0b6c7.3d74a8","name":"","active":true,"console":"false","complete":"false","x":987.5,"y":152,"wires":[]},{"id":"9672a7c7.985148","type":"switch","z":"a9a0b6c7.3d74a8","name":"Filter Self Tweets","property":"topic","propertyType":"msg","rules":[{"t":"neq","v":"tweets/RedReef_Digital","vt":"str"}],"checkall":"true","outputs":1,"x":493.5,"y":241,"wires":[["cb9edefb.21d1","d36fc575.a2a4b8","52bc296d.22b168"]]},{"id":"52bc296d.22b168","type":"function","z":"a9a0b6c7.3d74a8","name":"","func":"var fs = global.get('fs');\nmsg.media = fs.readFileSync('/root/bell.gif');\nreturn msg;","outputs":1,"noerr":0,"x":624.5,"y":579,"wires":[["7f19b532.18482c","74d13426.326b3c"]]},{"id":"7f19b532.18482c","type":"debug","z":"a9a0b6c7.3d74a8","name":"","active":true,"console":"false","complete":"media","x":996.5,"y":575,"wires":[]}]
Step 5: Build the Mechanical Hardware
Pictures coming soon, though you have the most latitude to be creative with this part:
- Trace a vertical servo holder on the 1/4" plywood with at least 3.5" of height above the surface of the base board. Cut this out and mount it to the baseboard with either a notch in the wood or 90 degree brackets.
- Create a notch to mount the servo so that it swings up and down
- Glue the servo arm to the plastic hammer using cyanoacrylate glue. You may need to shave off some of the plastic ridge on the hammer to make a flat enough spot for the servo arm.
- Drill a small hole through the servo mounting hole and hammer so that you can securely mount the arm to the servo. Position the bell under the hammer so that the flat part of the hammer makes contact with the bell button.
- Once all the glue dries, test the servo without the bell in place see the range of motion of the hammer. You can update the position numbers in the trigger node until you get the right position to ring the bell consistently.
Step 6: Pulling it all Together
Once you've gotten the hammer to swing to the proper position and gotten the bell to ring, your NodeRED code should run autonomously and ring every time the Twitter node detects a new match against your criteria. I also added a Meshblu node that will ring the bell when new message is detected on the Octoblu skynet. This was helpful for triggering a bell ring when a form was submitted on my landing page for the project. I was able to use Zapier to detect the form submission and create a webhook with the right UUID and token for the bell.
Were you able to build this too? Let me know in the comments section below if you've been successful!

Measure What Matters. Data Makes The Difference.
Free Guide: The 6 Marketing Metrics You Should Actually Care About
Don't get distracted by social shares, clicks, impressions, influencer scores, or other low-level metrics. This guide to the 6 Marketing Metrics You Should Actually Care About will show you how to measure what really matters for your business success.


